Outcome
You will complete an Offering Memorandum in a deliberate order and verify that its property story, financial facts, media, contacts, and final design agree.
Navigation path
Dashboard > Create New > Offering Memorandum > Document Wizard
Access
Offering Memorandum creation is available through the standard document flow. Template and publishing options follow the current plan.
On this page
What you will accomplish
Goals
- Prepare reliable source material
- Complete every applicable wizard section
- Deliver a verified OM without placeholders or conflicting figures
Offering Memorandum workflow
Build the source data first, add the marketing story second, and design only after the facts reconcile.
Setup
Package, scope, type, template
Property facts
Address, details, metrics
Marketing story
Narrative, media, maps
Analysis
Rent roll, income, valuation, comps
Review and delivery
Design, PDF, listing
- SetupProperty facts
- Property factsMarketing story
- Marketing storyAnalysis
- AnalysisReview and delivery
Before you start
Data, sources, and access to prepare
- Authority to market the property
- Verified property and transaction facts
- Approved photos and branding
- The rent roll or financial source data required by the assignment
Prepare these details
- Name one verified source for every financial figure
- Choose approved hero, exterior, interior, aerial, site-plan, and tenant images
- Confirm broker names, contact details, company branding, and required disclosure language
- Resolve material inconsistencies before entering them into CREBuilder
Complete the task
- 1
Create the OM draft
Dashboard > Create New
Select Offering Memorandum as the package.
Expected result: The creation flow continues with the supported property-structure options.
If this does not happen: Return to the package screen if another deliverable is selected.
- 2
Set the property structure
Get Started > Property structure
Select the structure that matches the marketed asset.
Expected result: The wizard prepares a single-property or supported multi-property workflow.
If this does not happen: Use the Multi-Property guide if several buildings or addresses are included.
- 3
Enter the property identity
Document Wizard > Property Details
Enter the verified address and primary transaction facts.
Expected result: The property identity displays consistently in the wizard.
If this does not happen: Correct the address before building maps or public links if geocoding is wrong.
- 4
Complete property data
Document Wizard > Property Data
Enter the physical and operating facts supported by the selected property type.
Expected result: Required fields are accepted and calculated display values update.
If this does not happen: Check the Property Types guide if a field or metric does not fit the asset.
- 5
Write the executive summary
Document Wizard > Executive Summary
Enter the approved executive summary.
Expected result: The summary states the central investment case without unresolved placeholders.
If this does not happen: Replace generic or unsupported claims with facts from the assignment sources.
- 6
Write the property overview
Document Wizard > Property Overview
Enter the approved property overview.
Expected result: The overview explains the subject property with verified facts.
If this does not happen: Remove details that belong only in a financial table or unsupported projection.
- 7
Write the investment highlights
Document Wizard > Investment Highlights
Enter the approved investment highlights.
Expected result: Each highlight states one source-backed benefit.
If this does not happen: Delete duplicate or unsupported highlights before continuing.
- 8
Upload approved media
Document Wizard > Images & Media
Upload the approved property images.
Expected result: The approved files appear in the media workspace.
If this does not happen: Replace any file that fails to render.
- 9
Set the media order
Document Wizard > Images & Media
Drag the uploaded property images into the approved sequence.
Expected result: The intended cover and section imagery appears in order.
If this does not happen: Adjust a crop in Review & Customize when the approved sequence exposes a poor crop.
- 10
Build the maps
Document Wizard > Maps
Create one map that supports the location story.
Expected result: The saved map appears as a map card and document page.
If this does not happen: Confirm the subject property address before rebuilding a map centered incorrectly.
- 11
Complete the financial sections
Document Wizard > Financials
Enter the analysis that matches the verified source data.
Expected result: The selected rent roll, income, expense, valuation, and comparable sections save without unresolved validation.
If this does not happen: Use the Financial Analysis guides to correct the model or unit convention before continuing.
- 12
Open document contacts
Document Wizard navigation
Select Contact Info.
Expected result: The primary contact plus any co-listing contacts are visible.
If this does not happen: Use the Contacts section below if a profile or team member is incorrect.
- 13
Open tenant profiles
Document Wizard navigation
Select Tenant Profiles when the step is available.
Expected result: The saved major-tenant cards are visible.
If this does not happen: Use the Tenant Profiles section below to determine whether the selected property type supports this output.
- 14
Open the confidentiality statement
Document Wizard navigation
Select Confidentiality.
Expected result: The current statement or administrator-managed locked version is visible.
If this does not happen: Use the Confidentiality section below before replacing approved language.
- 15
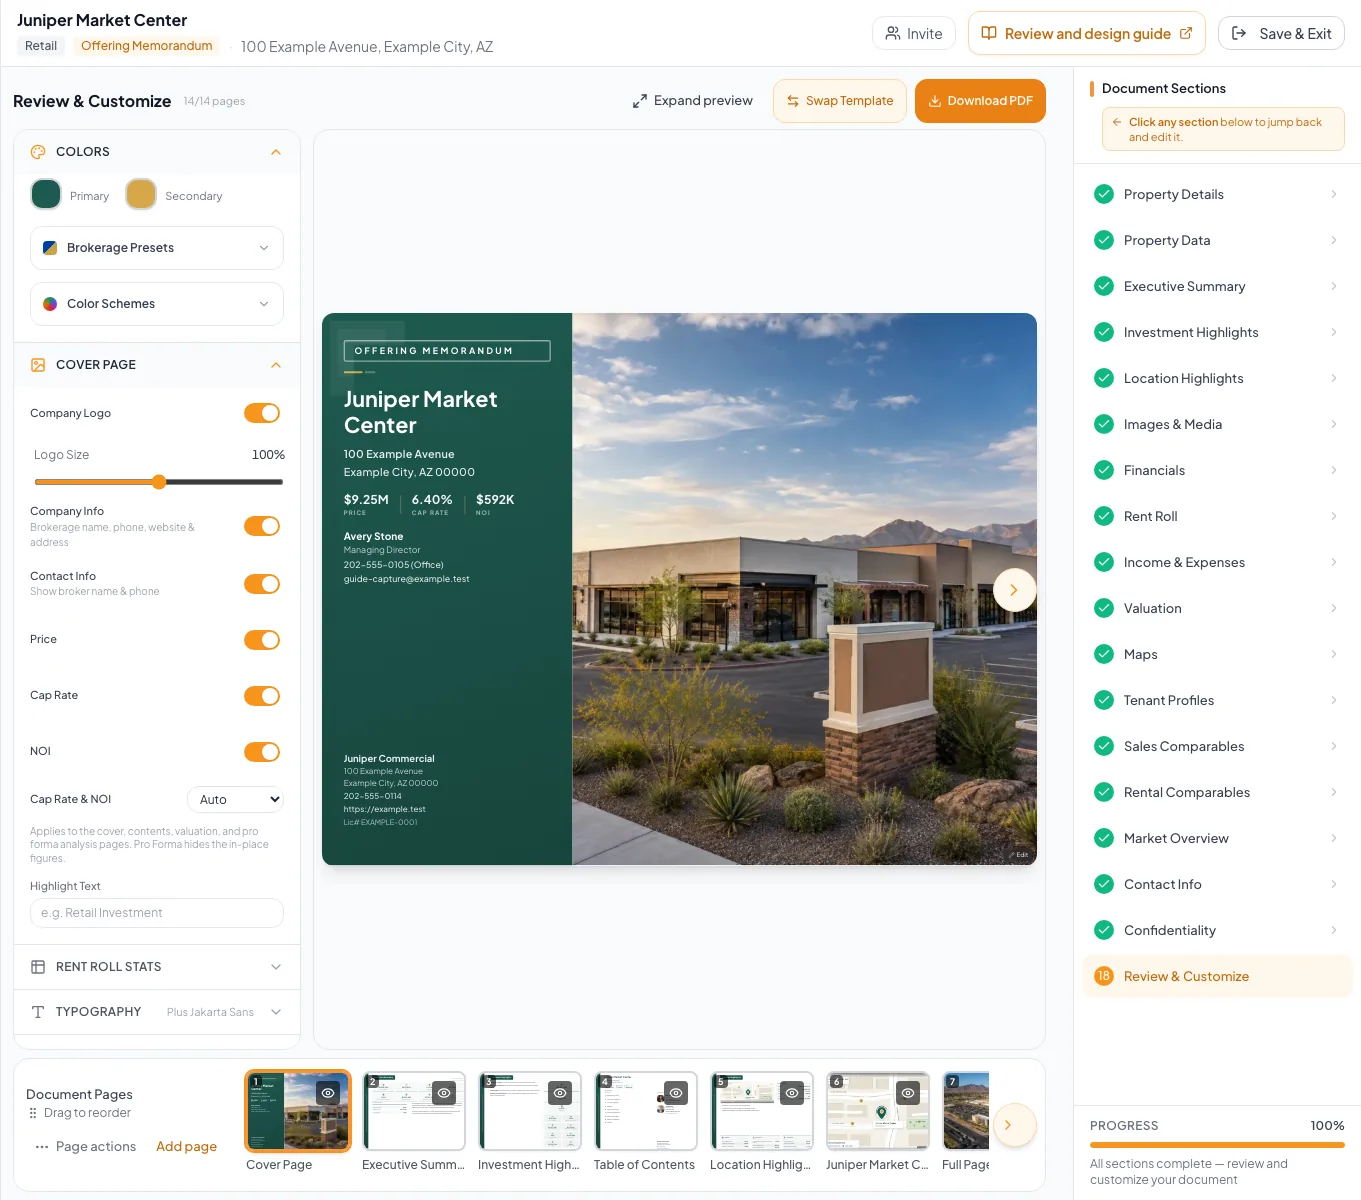
Review the assembled OM
Document Wizard > Review & Customize
Inspect every page in sequence.
Expected result: Each page uses the intended content, images, layout, and page order.
If this does not happen: Use the page edit action or wizard navigation to correct the source section.
- 16
Generate the final PDF
Review & Customize
Select Download PDF once.
Expected result: A new PDF finishes generating and downloads.
If this does not happen: Wait for pending saves, then retry once if generation fails.
Choose the contacts shown in the OM
Contact Info controls the broker and co-listing contact cards used by the marketing package. The primary contact comes from the signed-in user profile and is read-only in the document. A document can contain no more than four contacts.
| Contact position | How it is supplied | Editing rule |
|---|---|---|
| Primary contact | The signed-in user profile | Use Edit Profile to correct the source profile. Verify the document again after returning. |
| Second contact | Add Co-Listing Agent | Enter an approved co-listing contact directly in the document. Free accounts can have two total contacts including the primary contact. |
| Additional team contacts | Add Team Member | A paid account can select eligible team members. Coordinators are not available for document contact selection, and selected team-member cards use their team profile data. |
| Maximum | Primary plus co-listing contacts | The template layout accepts four total contacts per document. |
Contact details to verify
| Field | Requirement | What it means | Format | Units | Save behavior | Downstream effect |
|---|---|---|---|---|---|---|
| Full Name and Title | Required | The person and role printed on the contact presentation. | Plain text | Not applicable | Primary values save in Profile; editable co-listing values save when Contact Info Continue succeeds. | Identifies the broker or co-listing contact in the finished document. |
| Email and Phone | Recommended | The direct response channels shown to a reader. | Valid email address and formatted phone number | Not applicable | Primary values save in Profile; editable co-listing values save when Contact Info Continue succeeds. | Lets the reader contact the correct person. |
| License Number | Optional | The individual brokerage license identifier when required. | Plain text | Not applicable | Save the value in the owning profile or editable co-listing form before continuing from Contact Info. | Supports jurisdiction and company compliance requirements. |
| Profile Photo and Company Logo | Optional | Approved identity artwork used by supported contact layouts. | Approved uploaded image | Not applicable | Save each asset in the owning profile or company settings; Contact Info reads the stored profile asset. | Can appear on contact pages and other branded document surfaces. |
Required means the field is needed to complete or support this workflow. Some screens allow a draft to save before every required item is complete. The steps and troubleshooting call out controls the product actively blocks.
Contact selection steps
- 1
Open Contact Info
Document Wizard navigation
Select Contact Info.
Expected result: The primary contact card appears first.
If this does not happen: Reload once if saved contacts do not appear.
- 2
Verify the primary contact
Contact Information, primary contact card
Compare the primary card with the approved broker details.
Expected result: Every displayed primary-contact value is confirmed.
If this does not happen: Select Edit Profile when the source profile is wrong.
- 3
Open profile settings
Primary contact card
Select Edit Profile when the primary card is incorrect.
Expected result: An Edit Profile confirmation opens.
If this does not happen: Keep Editing Here closes the confirmation without leaving the document.
- 4
Continue to profile settings
Edit Profile confirmation
Select Go to Profile.
Expected result: CREBuilder saves current document progress and opens profile settings.
If this does not happen: Return to Contact Info after correcting the profile.
- 5
Add an editable co-listing contact
Contact Information
Select Add Co-Listing Agent.
Expected result: An editable second-contact form appears.
If this does not happen: The control is unavailable after the second-contact slot is filled.
- 6
Enter the co-listing name
Co-Listing Agent form, Full Name
Enter the approved full name.
Expected result: The contact has a document display identity.
If this does not happen: Confirm spelling against the approved signature or license record.
- 7
Enter the co-listing email
Co-Listing Agent form, Email
Enter the approved email address.
Expected result: The response address appears in the contact form.
If this does not happen: Correct the address before leaving if it does not match the approved source.
- 8
Enter the co-listing phone
Co-Listing Agent form, Phone
Enter the approved phone number.
Expected result: The contact form shows the intended direct or office number.
If this does not happen: Select the correct phone label if the displayed type is wrong.
- 9
Add a team contact
Add Team Member
Select the intended eligible team-member card.
Expected result: A read-only co-listing card is added from that member profile.
If this does not happen: Use Manage Team in Settings when the eligible member is missing.
- 10
Save the contact list
Wizard footer
Select Continue.
Expected result: The contact payload saves before the wizard advances.
If this does not happen: Remain on the page if Failed to save contacts appears, then retry after checking the connection.
The primary contact is incorrect
Likely cause: Primary contact values are owned by the user profile rather than the document form.
- Select Edit Profile.
- Open profile settings with Go to Profile.
- Correct the profile source.
- Return to the document to verify the result.
A team member is not listed
Likely cause: The member may already be selected, may be a Coordinator, or may not belong to the current team.
- Check the existing contact cards.
- Open Manage Team in Settings.
- Verify the member role before returning.
No more contacts can be added
Likely cause: The document reached the four-contact template limit.
- Remove an unintended co-listing contact.
- Keep only the approved contacts needed in the output.
Build major-tenant profiles
Tenant Profiles are narrative marketing cards for major tenants. They are separate from rent-roll rows, so adding a tenant to the rent roll does not create a profile. A standard tenant-profile output page appears only when at least one profile is saved and the property type supports that page.
Check property-type support
Standard Retail, Office and Medical Office, Industrial, and Mixed-Use outputs can use tenant profiles. Standard Multifamily, Land, Hospitality, Self-Storage, Mobile Home Park, and Net Lease outputs exclude tenant-profile pages. Custom templates can differ, so inspect Review & Customize.
Tenant profile fields
| Field | Requirement | What it means | Format | Units | Save behavior | Downstream effect |
|---|---|---|---|---|---|---|
| Trade Name | Required | The tenant brand displayed on the profile card. | Plain text | Not applicable | Stored when Add Tenant or Save Changes succeeds in the tenant-profile dialog. | The Add Tenant or Save Changes action stays unavailable until this field contains text. |
| Description | Recommended | A verified summary of the business and its relevance to the property. | Plain text, up to 2,000 characters | Characters | Stored when Add Tenant or Save Changes succeeds in the tenant-profile dialog. | Provides the narrative shown on supported profile pages. |
| Logo | Optional | An approved tenant logo image. | Uploaded image file accepted by the current control | Not applicable | The upload must finish, and the tenant profile must save, before leaving the dialog. | Adds brand recognition to the tenant card. |
| Industry, Year Founded, Headquarters, and Number of Locations | Optional | Business facts supporting the tenant story. | Text plus calendar-year and whole-number values | Calendar year and locations where applicable | Stored together when Add Tenant or Save Changes succeeds. | Appear as profile facts when populated. |
| Website and Credit Rating | Optional | The tenant site and verified rating or Not Rated status. | Public website URL plus selected rating or Not Rated | Not applicable | Stored together when Add Tenant or Save Changes succeeds. | Appear as reference facts when populated. |
| Square Feet and Lease Expiration | Optional | Property-specific occupancy facts for this profile. | Whole-number area plus calendar date | Square feet and date | Stored together when Add Tenant or Save Changes succeeds. | Tie the profile to the marketed asset when populated. |
Required means the field is needed to complete or support this workflow. Some screens allow a draft to save before every required item is complete. The steps and troubleshooting call out controls the product actively blocks.
Tenant profile steps
- 1
Open Tenant Profiles
Document Wizard navigation
Select Tenant Profiles.
Expected result: Existing tenant cards or the empty state appears.
If this does not happen: Confirm the property type and document package if the step is not available.
- 2
Start a tenant profile
Tenant Profiles
Select Add Tenant.
Expected result: The Add Tenant Profile dialog opens.
If this does not happen: Select Add First Tenant from the empty state when that is the visible control.
- 3
Name the tenant
Add Tenant Profile, Trade Name
Enter the verified trade name.
Expected result: The save action becomes eligible once required text is present.
If this does not happen: Remove leading or trailing placeholder text before saving.
- 4
Describe the tenant
Add Tenant Profile, Description
Enter the approved tenant description.
Expected result: The character counter reflects the saved-length limit.
If this does not happen: Shorten the description to 2,000 characters or fewer.
- 5
Open the logo picker
Add Tenant Profile, Logo
Select Upload Logo.
Expected result: The system file picker opens.
If this does not happen: Confirm the browser permits file selection if the picker does not open.
- 6
Choose the tenant logo
System file picker
Choose the approved logo image.
Expected result: The image uploads into the logo preview.
If this does not happen: Retry with another approved image file if Logo upload failed appears.
- 7
Choose the tenant industry
Add Tenant Profile, Industry
Enter the verified industry.
Expected result: The selected or typed industry appears in the field.
If this does not happen: Leave the optional field blank when the industry is not verified.
- 8
Enter the founding year
Add Tenant Profile, Year Founded
Enter the verified founding year.
Expected result: The numeric year appears in the field.
If this does not happen: Remove the optional year when the source is uncertain.
- 9
Enter the headquarters
Add Tenant Profile, Headquarters
Enter the verified headquarters location.
Expected result: The location appears in the field.
If this does not happen: Use the source location format approved for the OM.
- 10
Enter the location count
Add Tenant Profile, # of Locations
Enter the verified number of locations.
Expected result: The numeric count appears in the field.
If this does not happen: Leave the optional count blank when the current total is not verified.
- 11
Enter the website
Add Tenant Profile, Website
Enter the verified tenant website.
Expected result: The website appears in the field.
If this does not happen: Remove tracking parameters or an unverified address before saving.
- 12
Choose the credit rating
Add Tenant Profile, Credit Rating
Select the verified rating or Not Rated.
Expected result: The selected rating appears in the field.
If this does not happen: Use Not Rated only when that status accurately describes the approved source.
- 13
Enter occupied area
Add Tenant Profile, Square Feet
Enter the verified occupied square feet.
Expected result: The numeric area appears in the field.
If this does not happen: Compare the area with the lease source if it differs from the rent roll.
- 14
Enter lease expiration
Add Tenant Profile, Lease Expiration
Enter the verified lease-expiration label.
Expected result: The expiration appears in the field.
If this does not happen: Use the approved source wording when only a month or year is known.
- 15
Save the tenant profile
Add Tenant Profile footer
Select Add Tenant.
Expected result: The dialog closes and a tenant card appears.
If this does not happen: Enter Trade Name if Add Tenant is disabled.
- 16
Open a saved profile
Tenant profile card
Select Edit.
Expected result: The Edit Tenant Profile dialog opens with saved values.
If this does not happen: Move the pointer over the card if its action icons are hidden.
- 17
Save a correction
Edit Tenant Profile footer
Select Save Changes.
Expected result: The dialog closes and the card reflects the correction.
If this does not happen: Review the error toast for the server message if the save fails.
The tenant exists in Rent Roll but not Tenant Profiles
Likely cause: The two records are intentionally independent.
- Open Tenant Profiles.
- Create a separate profile for each major tenant that needs a marketing card.
The profile page is absent from the OM
Likely cause: No profile is saved, the selected property type excludes the page, or the current template does not include it.
- Confirm that at least one profile card exists.
- Review the property-type support note.
- Inspect the final page list in Review & Customize.
A profile was deleted by mistake
Likely cause: Delete permanently removes the profile after confirmation.
- Create the profile again from the verified source.
- Recheck Review & Customize after saving.
Review the confidentiality statement
Confidentiality controls the legal disclaimer text in the marketing package. It is different from the Deal Room NDA and access workflow. Use only language approved for this assignment.
| State or control | Current behavior | What to do |
|---|---|---|
| Editable statement | Typed changes autosave after about three seconds. | Wait for the Saved state before final review. Navigation also flushes pending content. |
| Built-in or saved template | Applying a template replaces the current editor content after confirmation when content already exists. | Review the replacement in full before leaving. |
| Administrator-managed statement | A lock banner appears and the editor plus template controls are unavailable. | Contact the team administrator to change the managed language. |
| Empty statement | The standard confidentiality output page has no content to render. | Enter approved text when the OM requires the page. |
Confidentiality review steps
- 1
Open Confidentiality
Document Wizard navigation
Select Confidentiality.
Expected result: The current statement and its editing state appear.
If this does not happen: Reload once if the content remains in a loading state.
- 2
Check for managed language
Confidentiality Statement
Read the administrator-managed banner when it appears.
Expected result: You know whether the statement can be edited in this document.
If this does not happen: Ask the team administrator to review locked language that is incorrect.
- 3
Open the template list
Confidentiality Statement header
Select Templates when editing is allowed.
Expected result: Built-in templates plus any saved user templates appear.
If this does not happen: Use the current content without a template when the approved statement is already present.
- 4
Choose a template
Templates menu
Select the approved template.
Expected result: The content changes immediately or a Replace Content confirmation appears.
If this does not happen: Cancel the replacement if the selected template is not correct.
- 5
Confirm template replacement
Replace Content confirmation
Select Replace Content.
Expected result: The selected template replaces the editor content.
If this does not happen: This replacement cannot be undone, so reapply the former approved template if necessary.
- 6
Edit the statement
Confidentiality rich-text editor
Enter the approved assignment-specific language.
Expected result: The editor marks the content as changed.
If this does not happen: Restore the approved template if an edit introduces incorrect language.
- 7
Verify company-name substitution
Confidentiality rich-text editor
Check the displayed company name.
Expected result: No unresolved COMPANY_NAME placeholder remains.
If this does not happen: Correct the company profile source or replace the placeholder with approved text.
- 8
Wait for autosave
Wizard save status
Pause until the save status shows Saved.
Expected result: The latest statement is persisted.
If this does not happen: Keep the page open if the status still shows Saving.
- 9
Open the final disclosure page
Wizard navigation
Select Review & Customize.
Expected result: A nonempty supported confidentiality page appears in the assembled OM.
If this does not happen: Return to Confidentiality if approved text is missing or stale.
Template controls are missing
Likely cause: The team administrator manages and locks the agreement.
- Read the lock banner.
- Send the requested language change to the administrator.
Applying a template would overwrite edits
Likely cause: Templates replace the complete current editor content.
- Cancel the confirmation.
- Copy any approved unique language to an authorized working source.
- Apply the correct template only after the replacement is approved.
The confidentiality page is missing from Review
Likely cause: The statement is empty or the selected template does not include the standard page.
- Confirm that approved text is saved.
- Inspect page visibility in Review & Customize.
- Verify the selected template supports the page.
OM completion reference
| Stage | Primary evidence | Completion test |
|---|---|---|
| Property facts | Survey, assessor, lease, owner, or approved source | Names, address, areas, dates, and facts agree |
| Marketing story | Approved positioning and property evidence | Every claim is specific and supportable |
| Financial analysis | Rent roll and underwriting source | Totals and unit conventions reconcile |
| Media and maps | Approved files and verified location | Images are sharp and map markers are correct |
| Final delivery | Latest saved wizard data | PDF contains no placeholders, overflow, or stale pages |
Verify before you finish
- The cover identifies the correct property and transaction
- Narrative facts agree with structured fields
- Financial totals reconcile to the approved source
- All images and maps belong to the property
- Contacts and disclosures are current
- The newly generated PDF has been reviewed page by page
Troubleshooting and next steps
A final page contains the wrong fact.
Likely cause: The value may come from a structured wizard field rather than visible narrative text.
- Use the Review page edit action when available.
- Correct the source wizard section and generate a new PDF.
A section is missing from the OM.
Likely cause: The package, property type, financial scope, template, or visibility setting may exclude it.
- Confirm the document setup and section completion.
- Review page visibility in Review & Customize.
Final verification
- Confidentiality rich-text editor: The editor marks the content as changed.
- Confidentiality rich-text editor: No unresolved COMPANY_NAME placeholder remains.
- Wizard save status: The latest statement is persisted.
- Wizard navigation: A nonempty supported confidentiality page appears in the assembled OM.
- No blocking warning, failed status, or unresolved validation message remains in the completed workflow.