Outcome
Your room holds the right diligence files, buyers sign the right NDA, and each PDF they download carries their name.
Navigation path
Deal Rooms > Open room > Files and Room settings
Access
Requires edit access to the room. Recipient watermarks need Email Required or an NDA access level so the downloader is identified.
On this page
What you will accomplish
Need more than one signer?
The steps below cover files and the standard single-signer NDA. If your workspace has multiple-signer NDAs, see Set up an NDA for multiple signers and Send an NDA to a buyer group further down.
Protected-file delivery
A watermark can name the downloader only after the gate identifies them.
Email or NDA gate
Verified recipient
PDF download
Recipient watermark and activity
- Email or NDA gateVerified recipient
- Verified recipientPDF download
- PDF downloadRecipient watermark and activity
Before you start
Data, sources, and access to prepare
- An existing Deal Room
- The files you plan to share
- Your NDA as text or a PDF, or the company default
Prepare these details
- Remove files the current audience should not see
- Use clear filenames and current versions
- Keep each file at 50 MB or less
- Use Email Required or an NDA level if you want watermarks
Complete the task
- 1
Open the room
Deal Rooms
Select the room card.
Expected result: The room page opens.
If this step does not work
Check the property name and status before uploading.
- 2
Open the file picker
Room > Confidential files
Select Drag files here or click to upload.
Expected result: Your file picker opens.
If this step does not work
Ask the room owner for edit access if the upload area says No confidential files.
- 3
Choose one approved file
File picker
Select a PDF, spreadsheet, Word file, CSV, or image up to 50 MB.
Expected result: The upload starts.
If this step does not work
Export a smaller copy or use a supported type if the file is rejected.
- 4
Wait for the file row
Room > Confidential files
Wait until the filename appears in the list.
Expected result: Buyers who pass the gate can now download it.
If this step does not work
Wait for the first upload to finish before trying again.

Upload the approved files, set NDA and watermark behavior, and test access with a synthetic prospect identity. - 5
Set the NDA source
Room > NDA document
Choose the standard text NDA, your own pasted text, or an uploaded PDF.
Expected result: The card shows which NDA visitors sign.
If this step does not work
Switch back to the standard text NDA if a PDF cannot be displayed.
- 6
Place PDF signature fields
NDA field editor, or Room > NDA document > Place signature fields
Place a required Signature field on the right page of your PDF.
Expected result: Fields appear where you placed them. You can also add Initials, Date signed, Text, Checkbox, and Static text. At least one Signature must stay Required.
If this step does not work
Drag, resize, or remove misplaced fields before saving.
- 7
Save the NDA layout
NDA field editor
Select Save & continue.
Expected result: Future visitors sign directly on your PDF. Earlier signatures keep their original document and values.
If this step does not work
Replacing the PDF clears placed fields, so place them again. Reload the editor if a save is blocked.
- 8
Verify the signed document
Room > Pending requests or Prospects
Select Download signed NDA after a test visitor signs.
Expected result: The signature sits in your placed field and a signature certificate is added at the end. With NDA – Approval Required, files stay locked until you approve.
If this step does not work
Signatures made before fields were placed appear only on the certificate page.
- 9
Enable recipient watermarking
Room > Room settings
Turn on Watermark downloads.
Expected result: Each PDF download is stamped with the recipient’s email, download time, and a trace ID.
If this step does not work
Switch the Access gate from Free Access to Email Required or an NDA level first.
- 10
Choose watermark intensity
Room > Room settings
Select Standard (visible) or Subtle (faint).
Expected result: The selected intensity is highlighted.
If this step does not work
Use Standard when the stamp must be obvious.
- 11
Test one PDF download
Public Deal Room
Download a PDF as your identified test visitor.
Expected result: The PDF shows your test email, the time, and a trace ID.
If this step does not work
Confirm the test used an identified gate and a PDF; other file types download unchanged.
Set up an NDA for multiple signers
Use a multiple-signer NDA when a buyer, their agent, the seller, or anyone else must sign the same agreement before files open. You build the roles once per room. Each buyer group then gets its own copy to sign, and you receive one executed PDF with every signature.
Turned on per workspace
Multiple-signer NDAs are turned on for selected workspaces. When yours is on, Room > Multi-party NDAs appears for anyone who can edit the room. Rooms you don’t set up keep today’s single-signer NDA. The room needs your own NDA uploaded as a PDF; a company-wide NDA that covers all your listings can’t collect multiple signers.
- 1
Open the role editor
Room > Multi-party NDAs
Select Set up roles and fields.
Expected result: The editor opens at Template roles with Buyer 1, Buyer agent, and Seller ready to rename.
If this step does not work
If the PDF doesn’t load, upload your NDA as a PDF under NDA document first. If Multi-party NDAs is missing, ask your Admin whether it is on for your workspace.
- 2
Name each role
Template roles > role name
Type a role name such as Buyer 1, Buyer agent, or Seller.
Expected result: Each role holds its own fields. The real signers’ names and emails are added later, on each request.
If this step does not work
Select Add when a second buyer must sign, so every buyer has a role of their own.
- 3
Mark optional roles
Role card > Optional role, removable before sending
Check Optional role, removable before sending for a party you might leave out.
Expected result: You can drop that role from a request before it goes out.
If this step does not work
Leave it unchecked for anyone who must always sign. Once invited, an optional party must still sign before the NDA is complete.
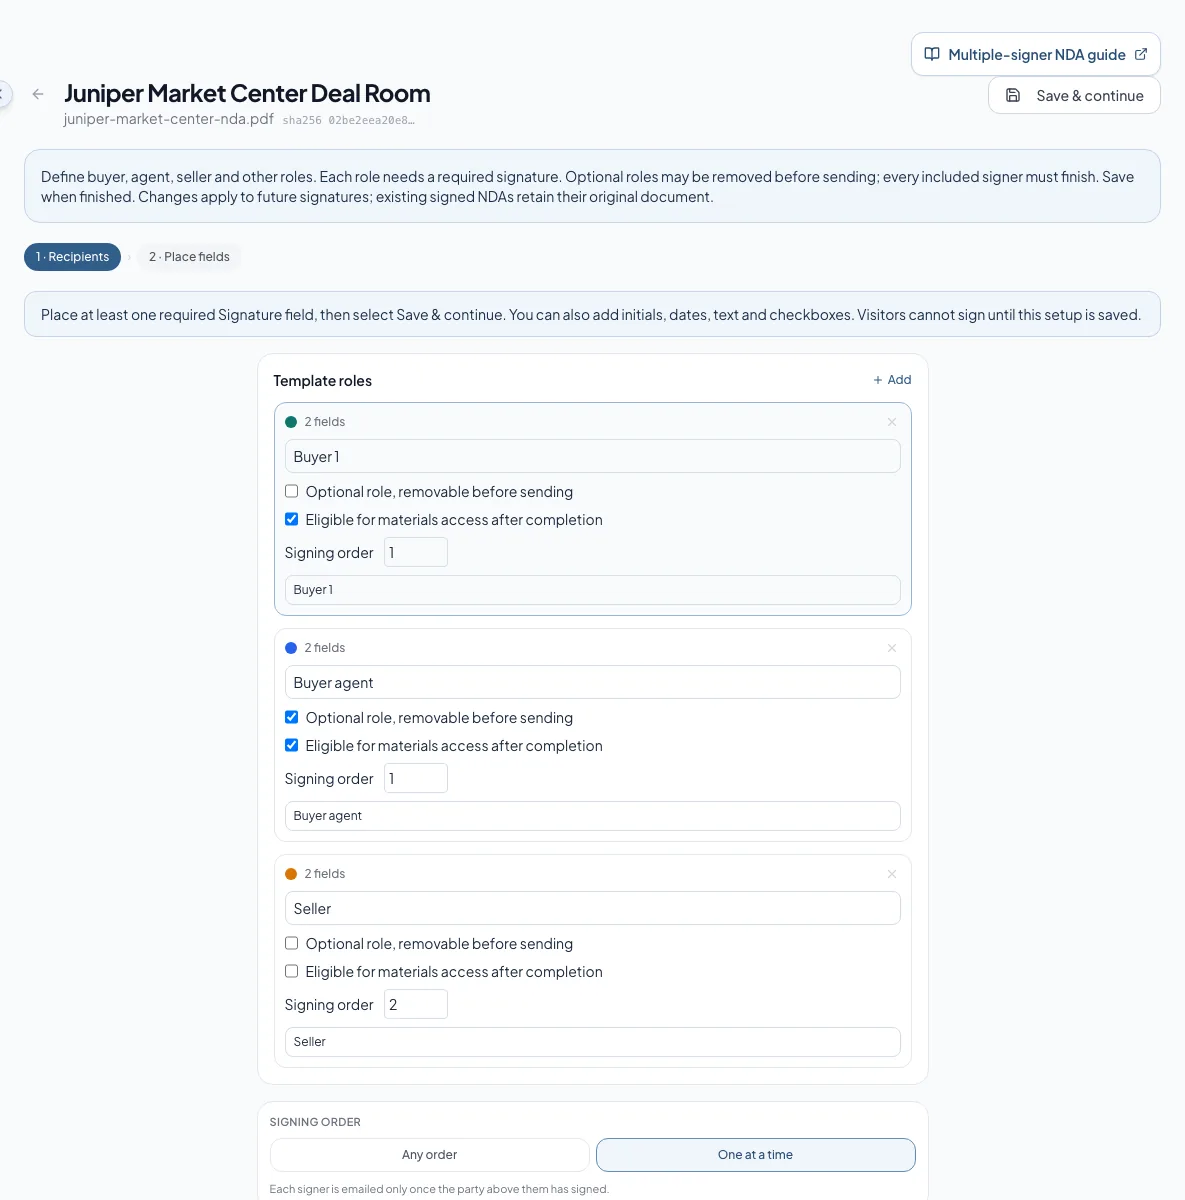
Name each role, mark optional parties and file access, and choose the signing order. - 4
Choose who can get the files
Role card > Eligible for materials access after completion
Check Eligible for materials access after completion on the buyer-side roles.
Expected result: Those signers can get their own access link once everyone signs and access is approved.
If this step does not work
At least one required role must be eligible. Leave the seller unchecked so they receive the executed NDA only.
- 5
Choose the signing order
Template roles > Signing order
Select Any order or One at a time.
Expected result: Any order emails every signer at once. One at a time emails each role after the role before it signs.
If this step does not work
For One at a time, number each role’s Signing order. Roles with the same number sign together.
- 6
Go to the PDF
Template roles
Select Continue to place fields.
Expected result: Your NDA opens with the roles listed beside it.
If this step does not work
If a message says Give each role a name, fill in the empty role.
- 7
Place each role’s signature
PDF > selected role > Signature
Place a required Signature field for every role.
Expected result: Each role has its own signature box, in that role’s color, where that party signs.
If this step does not work
Select the right role before placing a field. To fix a field placed for the wrong role, change its Assigned to.
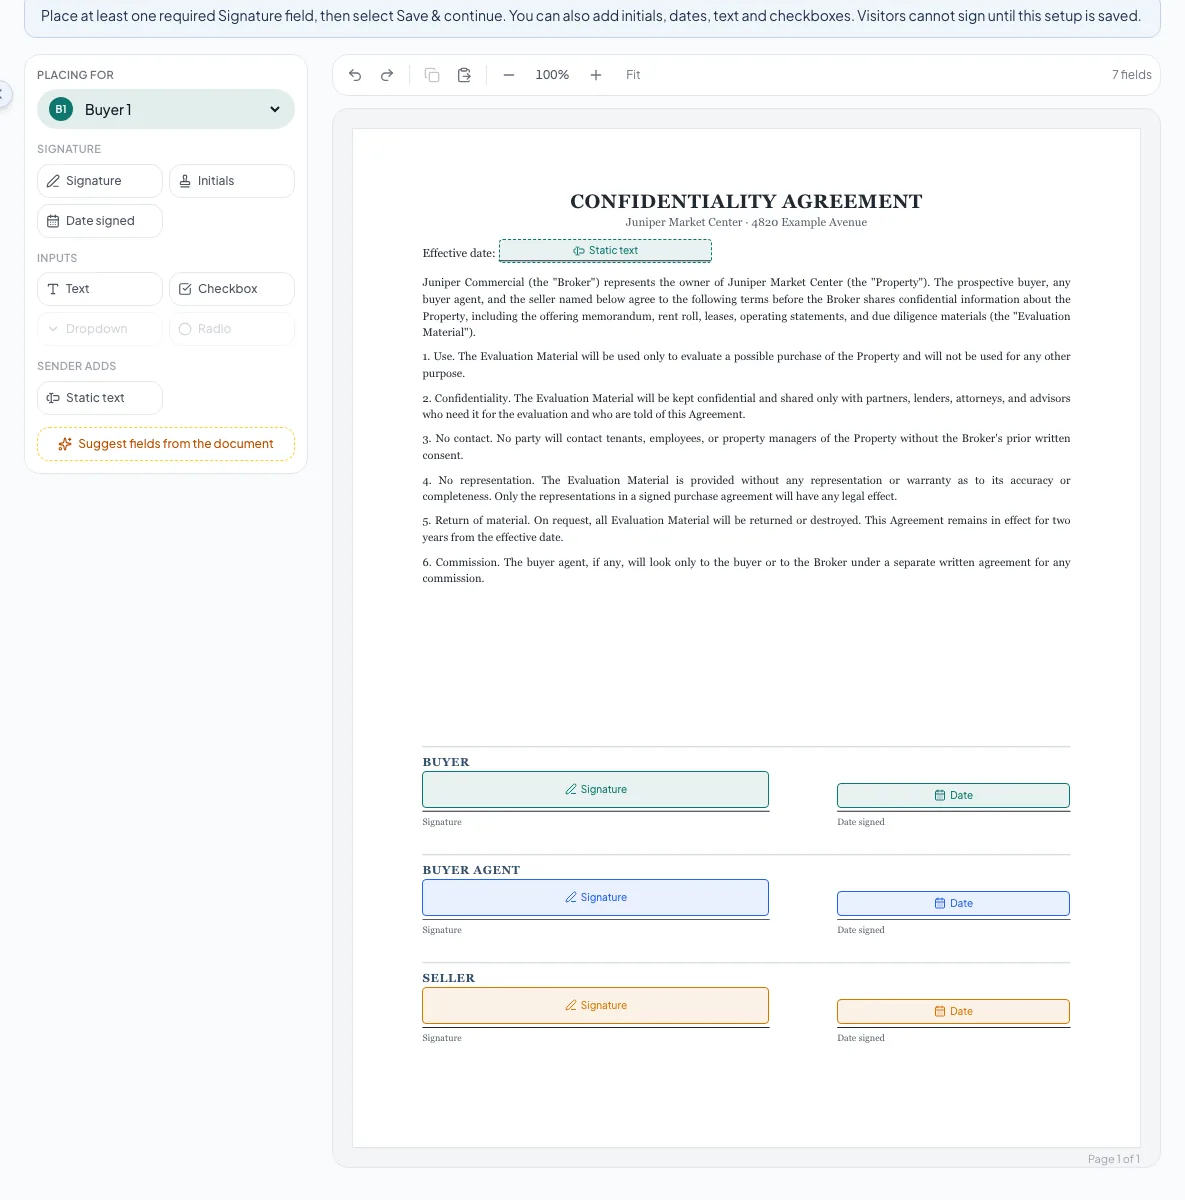
Each role gets its own signature and date fields in its color, with your effective date as static text. - 8
Add the other fields
PDF > selected role > field palette
Place any Initials, Date signed, Text, or Checkbox fields that role completes.
Expected result: Each field belongs to the role selected when you placed it.
If this step does not work
Use Field label to tell the signer what to enter. Turn off Required for answers that are optional.
- 9
Add your own wording
PDF > Static text
Place Static text for wording you supply, such as the effective date or property name.
Expected result: Your default wording appears on the PDF. You can change it on each request before sending, and signers can’t edit it.
If this step does not work
Use Date signed only for the day a party signs. It records that signer’s actual date in UTC and is not an effective date.
- 10
Save the template
Editor > Save & continue
Select Save & continue.
Expected result: Role template saved for future requests appears, and you return to the room, now using multiple-signer NDAs.
If this step does not work
Read the message if saving fails. Every role needs a required signature, and you need to reload if someone else changed the NDA meanwhile.
A new PDF resets the roles
Uploading a different NDA PDF, or removing it, switches the room back to single-signer NDAs and clears the roles. Set them up again before the next request. NDAs you already sent keep their own copy of the PDF they were sent with.
Check the template before you use it
- Every role has a required signature
- Each field belongs to the right role
- Optional roles and materials access are set on purpose
- Any order or One at a time matches how you want it signed
- The effective date is static text, not a Date signed field
Send an NDA to a buyer group
Each buyer group gets its own NDA. A request starts when a buyer asks from your listing or when you start one in the room. Either way it waits as Awaiting recipient confirmation until you confirm who signs. A request sends no invitations and grants no file access until you send it.
- 1
Enter the requesting buyer
Room > Multi-party NDAs
Enter the buyer’s name and email.
Expected result: Create NDA request becomes available.
If this step does not work
Select Use a CRM contact to fill both from a contact. If the room says to select an NDA access gate, choose NDA – Auto Access or NDA – Approval Required first.
- 2
Create the request
Multi-party NDAs > Create NDA request
Select Create NDA request.
Expected result: The buyer appears in the list as Awaiting recipient confirmation.
If this step does not work
Requests from your listing page show up here on their own, so check the list before creating a second one.
- 3
Open the request
Multi-party NDAs > buyer row
Select the buyer’s row if it is collapsed.
Expected result: You see any recipients the buyer proposed, their qualification answers, and one card per role.
If this step does not work
New requests open automatically. Select the row again to collapse it.
- 4
Check the PDF
Request > Review source PDF
Select Review source PDF.
Expected result: The exact PDF this request will send downloads to your computer.
If this step does not work
If the PDF is wrong, fix the template for future requests. This request keeps the PDF it was created with.
- 5
Choose optional roles
Request > role checkbox
Check each optional role this buyer group needs.
Expected result: Only checked roles sign this NDA.
If this step does not work
Uncheck Buyer agent for a buyer without an agent. Required roles can’t be unchecked.
- 6
Fill in each signer
Request > role card > Full name and Email
Enter the name and email of the person signing each included role.
Expected result: Every included role has one named signer.
If this step does not work
The requesting buyer and any matching proposals are filled in for you. Keep the requesting buyer in a role that can get the files. If one person fills two roles, enter them on both.
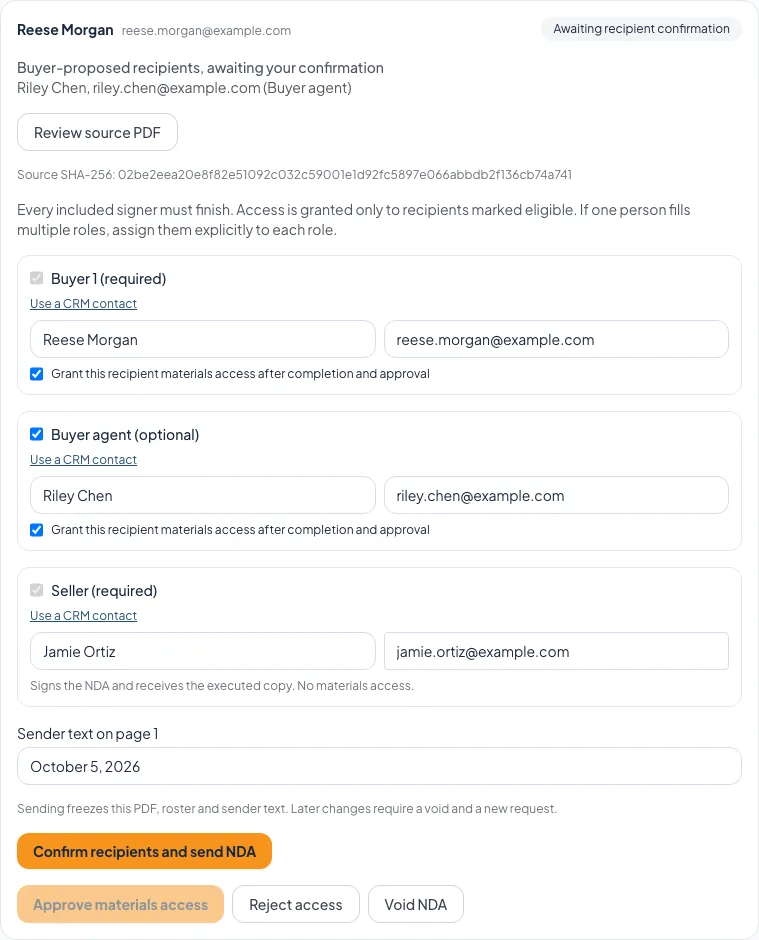
Confirm who signs for this buyer group, who gets the files, and your wording before sending. - 7
Set file access
Role card > Grant this recipient materials access after completion and approval
Check the box for each signer who should get the files.
Expected result: Unchecked signers, and roles marked No materials access, receive the executed NDA only.
If this step does not work
If a role you need doesn’t offer the box, change it in the template for future requests.
- 8
Check your wording
Request > Sender text boxes
Review each static text value.
Expected result: The effective date, property name, and other wording are right for this buyer group.
If this step does not work
Every static text box needs a value before you can send.
- 9
Send the NDA
Request > Confirm recipients and send NDA
Send the NDA with the confirmation button.
Expected result: Each signer gets a personal invitation, all at once or in signing order.
If this step does not work
Fix the message shown if sending fails. To change anything after sending, void the NDA and send a replacement.
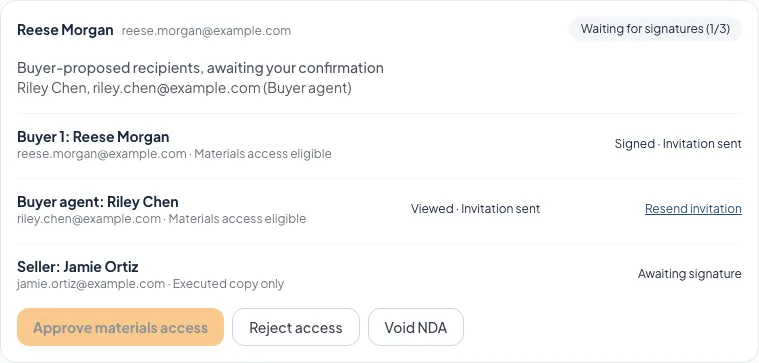
After sending, follow each signer’s progress and invitation status, and resend a link when needed.
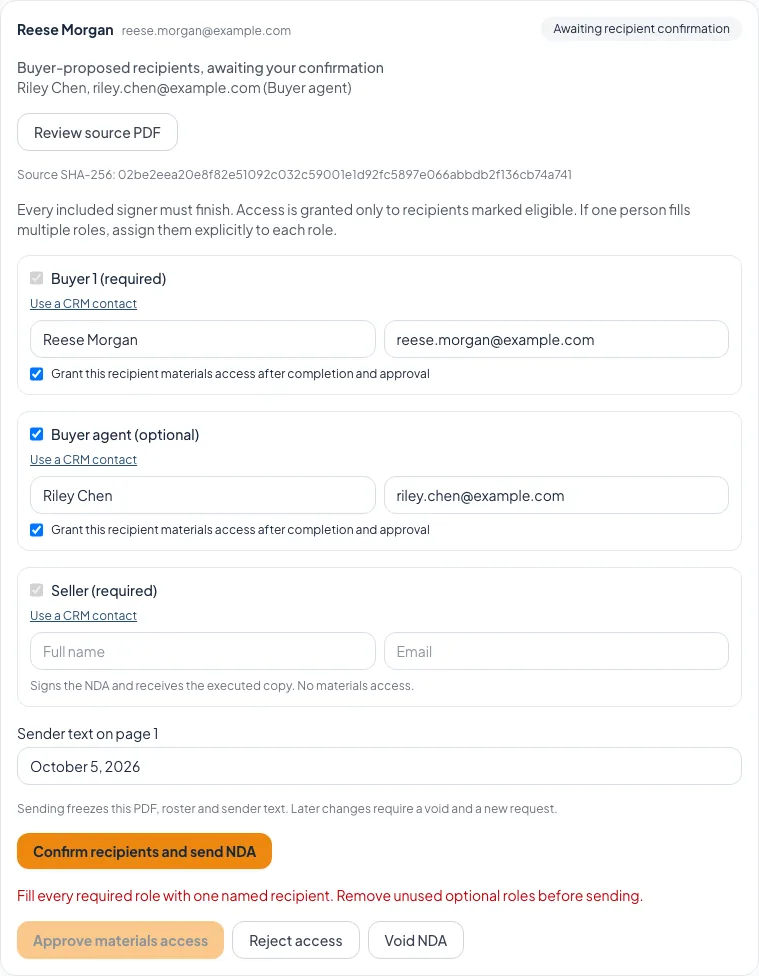
What sending locks in
Sending locks this request’s PDF, wording, signers, fields, signing order, and who gets the files. Template changes only affect new requests. Use single-signer NDAs for future requests also changes new requests only; NDAs already sent keep going. Before buyers can sign a single-signer NDA again, place its signature fields under NDA document.
What each signer sees
Every signer follows the same steps on their own link. Share this with a buyer, agent, or seller who asks how it works.
- 1
Open the personal invitation
Invitation email > Review and sign
Open the signing link in the invitation email.
Expected result: Verify your email opens and shows the invited address with most of it hidden.
If this step does not work
Each link works only for the person it was sent to. If the name or email is wrong, ask the broker for a corrected NDA instead of forwarding the link.
- 2
Request a verification code
Verify your email > Send verification code
Select Send verification code.
Expected result: A six-digit code is emailed to the invited address. It expires in 10 minutes.
If this step does not work
Select Request another code if it expires. After three codes in 15 minutes, wait 15 minutes before asking again.
- 3
Verify the invited mailbox
Verify your email > code boxes
Type the six-digit code.
Expected result: The NDA opens with only your own fields to complete.
If this step does not work
Use the newest code. After five wrong tries, request a new one.
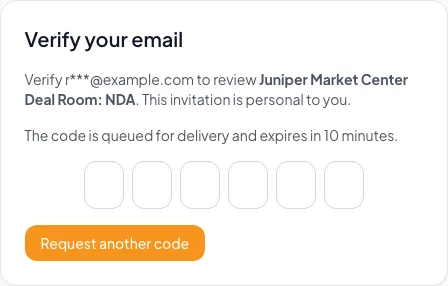
Each signer verifies their own email with a six-digit code before the agreement opens. - 4
Adopt your signature
Signing page > Adopt signature
Adopt a typed or drawn signature.
Expected result: Your signature is ready for your signature and initials fields.
If this step does not work
On a phone, draw with your finger and check the mark before adopting it.
- 5
Complete your assigned fields
Signing page > your fields
Fill in each highlighted field.
Expected result: Progress saved appears as your answers save.
If this step does not work
Use Next to jump to the next field. If Save failed – retrying appears, wait for it to clear before closing the page.
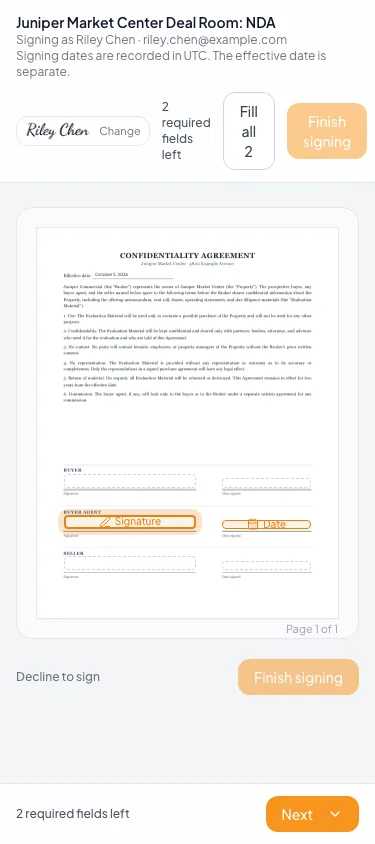
On a phone, the bottom bar steps the signer through their own fields. - 6
Submit your signature
Signing page > Finish signing
Select Finish signing.
Expected result: Signature recorded confirms your signature is saved.
If this step does not work
If Finish signing is unavailable, complete the required fields and accept the consent. A delay preparing the final PDF never undoes a signature.
Signing and file access are separate
After signing, the page shows where things stand: waiting for the other signers, preparing the executed PDF, or waiting for broker approval. Files stay locked until all included parties finish, the executed PDF is ready, and any required broker approval is complete. Each signer you marked for file access gets their own access email; everyone else gets the executed NDA only.
Coming back later
Signers return to the same link to pick up where they left off. Email verification lasts 30 minutes in one browser, so a new code may be needed after that or on another device. Date signed fills in the actual signing date in UTC, which can differ from the signer’s local date.
File and protection reference
Room file
- What it does
- PDF, Excel, Word, CSV, or image
- Good to know
- Up to 50 MB per file
Standard text NDA
- What it does
- Your company NDA, or CREBuilder’s standard NDA when none is saved
- Good to know
- Read it once before relying on it
Pasted NDA text
- What it does
- Your own confidentiality language for this room
- Good to know
- New signers see the latest saved text
Uploaded NDA PDF
- What it does
- Signature, initials, date, text, checkbox, and static text fields on your own document
- Good to know
- Save at least one required Signature field before visitors can sign
Watermark downloads
- What it does
- Stamps identified PDF downloads with email, time, and trace ID
- Good to know
- Other file types download unchanged
Troubleshooting and next steps
A file upload fails.
Likely cause: The file may be over 50 MB, an unsupported type, or interrupted.
- Check type and size.
- Retry one file at a time.
The signature is missing from the original PDF page.
Likely cause: No fields were placed before that visitor signed, so the signature is on the certificate page.
- Download the signed NDA and check its last page.
- Place and save signature fields for future visitors.
The PDF has no watermark.
Likely cause: The room uses Free Access, Watermark downloads is off, or the file is not a PDF.
- Choose Email Required or an NDA level.
- Turn on Watermark downloads.
- Test with a PDF as an identified visitor.
Final verification
- Every file belongs in this room
- Filenames and versions are clear
- If an NDA is required, it opens and shows the right text
- The Access gate identifies visitors when you expect watermarks
- If watermarking is on, a test PDF shows the stamp
- For multiple signers, every role has a required signature and you checked each buyer group before sending
- No blocking warning, failed status, or unresolved validation message remains in the completed workflow.
Your next OM, done this afternoon
Turn your property facts, photos and financials into a polished, branded offering memorandum. Most brokers finish in 30 to 90 minutes.
No credit card required.